In this article, you will learn about:
- The motivation behind writing this article
- The architecture of the Spring Petclinic Rest project
- The architecture of the Helidon Petclinic project
- How to migrate the data module
- How to migrate REST controllers
- How to write tests
- Interesting issues and pitfalls, along with their solutions
Motivation
Initially, I anticipated the article would be short, but it ended up being quite lengthy. You could think of it as a missing chapter from the “Beginning Helidon” book I co-authored with my colleagues. Yes, it’s a bit cheesy to advertise the book in the first paragraph. You might assume that promoting the book was my sole motivation for writing this article. Admittedly, it’s a significant motivator, but not the only one.
In the Helidon support channels, we frequently encounter questions about migrating Spring Boot applications to Helidon. To address these inquiries, we concluded that creating a Helidon version of the well-known Spring Petclinic demo application and documenting the migration strategies and challenges would be the best approach. I volunteered for the task because of my previous experience with Spring programming and because I hadn’t engaged in real programming for quite some time, and I wanted to demonstrate that I still could. Whether I succeeded or not, you readers can decide after reviewing the work. Perhaps I shouldn’t have taken it on. You can find the result here. Anyway, enough philosophical musings; let’s get down to business.
Original Spring Petclinic Rest project
When I began my research, I started with the original Spring Petclinic. However, it seemed a bit outdated to me, so I explored other Petclinic forks available at https://github.com/spring-petclinic. One that caught my attention was the Spring Petclinic Rest, which functions as a RESTful service. Its architecture aligns well with the concepts of Helidon. Additionally, it features an Angular-based UI in a separate project. The plan was to develop a Helidon-based backend to complement the frontend project for demonstration purposes.
The Spring Petclinic Rest project is thoroughly documented in its README.md. For convenience, I’ll provide some basic design concepts here:
- It operates as a RESTful service, serving as the backend for the Spring Petclinic Angular project.
- The project adopts an API-first approach, with all endpoints and interfaces described in an OpenAPI document. Java sources for the corresponding model classes and services are generated by the
openapi-generator-maven-plugin. - Data is stored in a database and supports HSQL, MySQL, and PostgreSQL.
- The project supports Basic Authentication security and manages users and roles in the database.
There are two data models:
- Data model – It consists of JPA entities reflecting the database structure.
- DTO (Data Transfer Objects) – These define data used to communicate with the public RESTful service. They are generated from the OpenAPI document.
And three layers:
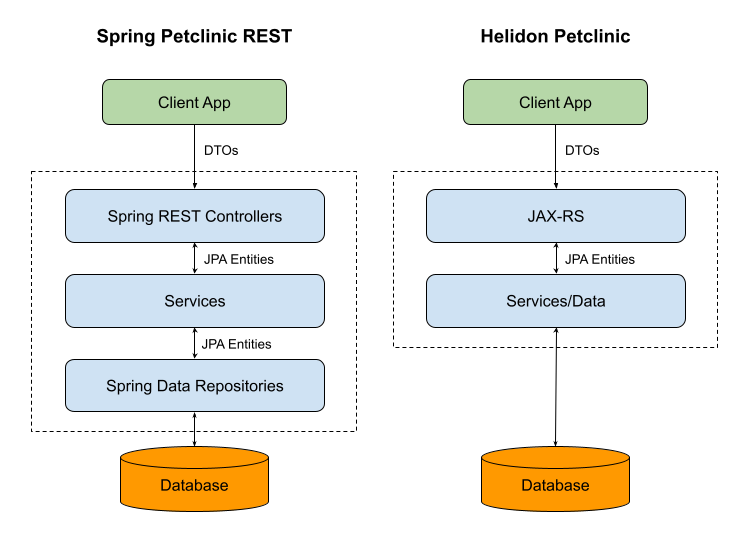
- Presentation layer – This layer contains RESTful controllers that implement the public API. It operates using DTOs and serves as a thin layer. Its purpose is to retrieve data, map it to entities (data model) using a mapper, send it to the service layer for processing, convert the result to DTO, and then return it to the client.
- Business layer – Also known as the service layer. This layer contains the business logic and operates using entities (data model). It communicates with the database layer.
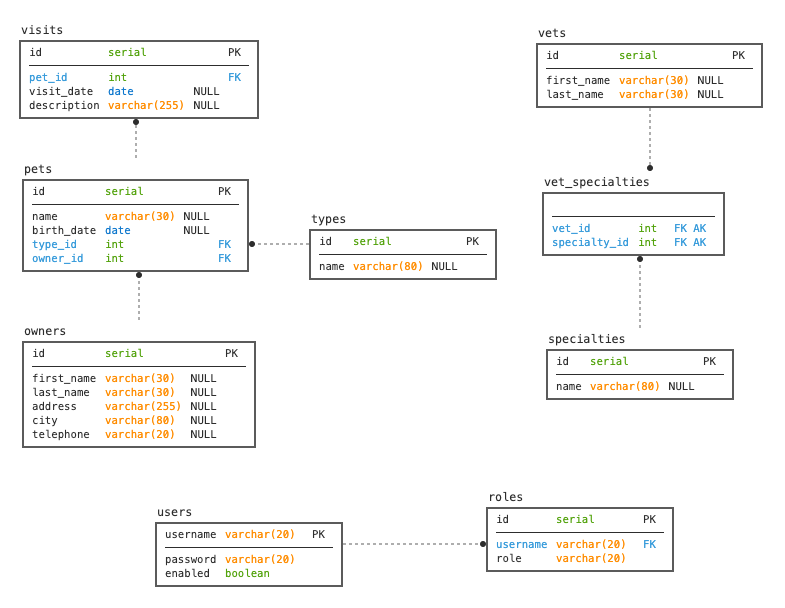
- Database layer – Utilizing Spring Data JPA implementing the repository pattern. This layer consists of data repository interfaces, which perform operations on data such as querying, adding, and deleting. The database structure diagram is provided below.
Helidon Petclinic
Helidon Petclinic is a project I created. You can check it out here. The README.md contains information about how to build and run it.
My goal was to preserve the design and structure of the application as much as possible. In the end, I achieved a layer structure very similar to the original. The only significant change is an optimization related to the database layer. I perform database operations in the service layer, effectively integrating it with the database layer. The original application’s service layer methods typically involved only a single line call to the data repository, so this made sense to me. I draw a picture (see below) to help you understand the difference.
Spring and Helidon are different frameworks. Spring is built around the proprietary Spring Injection. Although it integrates with some open-source libraries and standards, most of its features are Spring-specific. On the other hand, Helidon (Helidon MP) is built on top of Enterprise Java standards such as Jakarta EE and MicroProfile, which technically makes it more open. There is some overlap in third-party libraries. Both Spring and Helidon use JPA, which will make our database layer migration easier. Additionally, Jackson and Mockito can be used in both frameworks. But I would recommend using Jakarta equivalents of Jackson for better Jakarta compatibility. In the table below, I have listed Spring components and their corresponding Helidon equivalents, which I’ll use in my project.
| Spring | Helidon |
|---|---|
| Spring Injection | Jakarta Contexts and Dependency Injection (CDI) |
| Spring REST Controller | Jakarta RESTful Web Services (JAX-RS) |
| Spring Data | Jakarta Persistence (JPA) |
| Spring Open API generator | Helidon Open API generator |
| Spring Tests Framework | Helidon Tests |
| Jackson | Jakarta JSON Processing (JSON-P) and Jakarta JSON Binding (JSON-B) |
| Spring Configuration | MicroProfile Config |
I had to make some compromises. For simplicity’s sake, I only added support for HSQL. I also omitted security support. Basic Authentication with passwords stored in the database is not what I would recommend using; it falls far short of modern security standards. I may consider supporting security in future versions of the project if there is demand for it.
JPA Model
The JPA model comprises a set of JPA entities. JPA is a standard, and one of the beauties of standards is that you don’t need to alter things when migrating code to another runtime. I made only minor adjustments to these classes, mainly replacing Spring-specific features with their Helidon equivalents. I replaced the usage of ToStringCreator in toString() methods with code generated by my IDE (IntelliJ Idea rules!). Additionally, I replaced instances of PropertiesComparator.sort() with Collections.sort().
Spring code:
public List<Pet> getPets() {
    List<Pet> sortedPets = new ArrayList<>(getPetsInternal());
    PropertyComparator.sort(sortedPets,
        new MutableSortDefinition("name", true, true));
    return Collections.unmodifiableList(sortedPets);
}
Helidon code:
public List<Pet> getPets() {
    var sortedPets = new ArrayList<>(getPetsInternal());
    sortedPets.sort(Comparator.comparing(Pet::getName));
    return Collections.unmodifiableList(sortedPets);
}
Another change I made was adding named queries to serve as a replacement for the Spring Data repositories. This is what I’ll discuss in the next section.
Replacing Spring Data repositories
Spring Data is a part of the Spring framework designed for working with databases. Spring Data implements the repository pattern, which involves defining interfaces containing methods to retrieve data (entities or collections of entities). The framework automatically generates the implementation of these interfaces. Operations on data and search criteria are defined by method names. For instance, the Collection<Pet> findAll() method retrieves all pets, while void save(Pet pet) updates the given Pet object in the database. This abstraction eliminates the need to understand the underlying query language. While some may find it convenient, I personally prefer working with SQL statements as they are more intuitive to me. I suppose I’m just too old-fashioned.
To do this the Helidon way, I used JPQL queries, which I find preferable. In the service layer, rather than calling methods from repositories, I utilize the pure JPA API to achieve the same results.
First step is injecting the entity manager into ClinicServiceImpl:
@PersistenceContext(unitName = "pu1")
private EntityManager entityManager;
The entity manager will handle all database operations, which were previously handled by the repositories.
Next, I went through all methods and replaced repository usage with equivalent code using the entity manager, following certain patterns.
Replacing find methods
For find* methods a named query in the corresponding entity class has to be created and executed in the body of a method.
public List<Pet> findAllPets() {
    return entityManager.createNamedQuery("findAllPets",
        Pet.class).getResultList();
}
@NamedQueries({
    @NamedQuery(name = "findAllPets",
                query = "SELECT p FROM Pet p")
})
public class Pet extends NamedEntity {
    ...
}
Save methods
The ClinicService.save* methods combine ‘create’ and ‘update’ functionality. However, JPA provides separate methods for creating and updating entities. Therefore, I needed to separate these operations in the code, as shown in the sample below.
@Transactional
public void saveOwner(Owner owner) {
    if (owner.isNew()) {
        entityManager.persist(owner);
    } else {
        entityManager.merge(owner);
    }
}
Delete methods
The replacement of delete methods is straightforward, but there is one pitfall that users need to understand and know how to avoid. Here is a sample of how it’s done for most entities:
@Transactional
public void deleteOwner(Owner owner) {
    entityManager.remove(owner);
}
However, for some entities, it needs to be handled differently. There are cases where an entity is dependent and managed by its parent entity. Such a relationship exists between the Owner and Pet entities. Owner contains a set of Pet entities annotated with cascade = CascadeType.ALL.
public class Owner extends Person {
    @OneToMany(cascade = CascadeType.ALL,
               mappedBy = "owner",
               fetch = FetchType.EAGER,
               orphanRemoval = true)
    private Set<Pet> pets;
    ...
}
In this case, to remove a pet, instead of invoking entityManager.remove(pet), you need to delete it from the Owner.pets set and call entityManager.merge(owner).
@Transactional
public void deletePet(Pet pet) {
    var owner = pet.getOwner();
    owner.deletePet(pet);
    entityManager.merge(owner);
    entityManager.flush();
}
This is a legitimate use case. You can read more about it here.
Transactions
The handling of transactions differs between Helidon and Spring. Spring utilizes Spring Transactions, while Helidon uses Jakarta Transactions (JTA). However, these two APIs are similar. The project employs declarative transactions, defined by placing the @Transactional annotation on methods that need to be executed within a transaction. I only replaced the import from org.springframework.transaction.annotation.Transactional to jakarta.transaction.Transactional. Additionally, since JTA does not support read-only transactions, I removed the readOnly = true parameter from Spring’s @Transactional annotation when present. Furthermore, I optimized the code by removing transaction support from methods that do not require transactions, such as methods that only read data from the database without writing to it.
Updating REST Controllers
Migrating REST controllers to Helidon is one of the complicated tasks. Source code is different because Helidon uses Jakarta RESTful Web Services (JAX-RS) and Spring uses proprietary libraries. I had to rewrite all REST controllers manually. There are some patterns which can be used, but it’s not as obvious as it is with data repositories.
@RequestScoped (1)
public class PetResource implements PetService { (2)
    @Context (3)
    UriInfo uriInfo;

    private final ClinicService clinicService;
    private final PetMapper petMapper;

    @Inject (4)
    public PetResource(ClinicService clinicService,
                       PetMapper petMapper) {
        this.clinicService = clinicService;
        this.petMapper = petMapper;
    }

    @Override
    public Response addPet(PetDto petDto) { (5)
        var owner = clinicService.findOwnerById(
            petDto.getOwnerId()).orElseThrow();
        var pet = petMapper.toPet(petDto);
        pet.setOwner(owner);
        clinicService.savePet(pet);

        var location = UriBuilder
            .fromUri(uriInfo.getBaseUri())
            .path("api/pets/{id}")
            .build(pet.getId());

        return Response.created(location)
            .entity(petMapper.toPetDto(pet))
            .build();
    }
    ...
}
<1> – Makes this class a request scoped CDI bean
<2> – Implements PetService generated interface. This interface contains JAX-RS annotations defining paths, HTTP methods, etc.
<3> – Injecting UriInfo class usng JAX-RS @Context annotation
<4> – Constructor injection of ClinicService and PetMapper
<5> – JAX-RS method used to add a pet
Remember that this project is API first and REST resources and the model classes it operates are generated from the OpenAPI document. All Rest controllers implement these generated interfaces. And these interfaces are different for Spring and Helidon.
I’ll explain the OpenAPI plugin configuration in the next section.
OpenAPI
To generate code out of OpenAPI document, I used OpenAPI plugin provided by Helidon. I couldn’t use a plugin used in the original project because it generates the Spring code, which is not compatible with Helidon. You can find the plugin configuration in the project pom.xml file. I won’t go deep into the configuration. The only thing I mention is an option to skip generating data model tests. I couldn’t find it in documentation. The option is <generateModelTests>false</generateModelTests>.
There are some differences in how these two generators work. First difference I noticed is handling read only fields. Spring generator doesn’t do anything and treats read only fields as all other fields. It means that they are mutable and not read only. Helidon generator behaves differently. It treats read only fields as immutable fields. The values are passed as the constructor parameters and there are no setters. Which makes them truly immutable. On the other hand, it adds some complications when migrating from the Spring approach. The major issue is that no-args constructor cannot be used anymore when converting entities to DTOs. I’ll explain how to deal with it in Mapstruct section below.
Another issue I faced was different handling of tags. Helidon plugin uses tags to group operations into services.
In the Open API document tags are defined like this:
tags:
  - name: owner
    description: Endpoints related to pet owners.
  - name: pet
    description: Endpoints related to pets.
    ...
If you look at the paths, there is addPetToOwner operation at /owners/{ownerId}/pets with pet tag. All other Owner-related operations are tagged with owner.
paths:
  /owners/{ownerId}:
  get:
    tags:
      - owner
    operationId: getOwner

  /owners/{ownerId}/pets:
  post:
    tags:
      - pet
    operationId: addPetToOwner
    summary: Adds a pet to an owner
    description: Records the details of a new pet.
As result, Helidon generator places addPetToOwner method in PetService and all other Owner related methods to OwnerService. It causes paths collision because the base path of OwnerService is /owner and it supposed to handle all sub-paths too. But there is /owners/{ownerId}/pets handler in PetService.
I fixed it by changing a tag in /owners/{ownerId}/pets path to owner.
Mapstruct
Mapstruct is a library for generating converters between Java beans. It’s based on an annotation processor and does generation at build-time. It’s used in the project to generate mappers between entities and DTOs. It can be configured for usage in Spring projects as well as in CDI based Jakarta EE projects. I used the second option because Helidon project is a CDI based application. To do it add the following to Mapstruct Maven plugin configuration:
<compilerArgs>
    <compilerArg>
        -Amapstruct.defaultComponentModel=jakarta-cdi
    </compilerArg>
    ...
</compilerArgs>
One of the issues I had to solve with Mapstruct is making it work with DTOs generated by Helidon Open API generator. I mentioned above that Helidon generator doesn’t generate setters for fields marked as read only in the OpenAPI document. It generates a constructor with parameters where initial values of all read only fields must be passed. It requires a special treatment using object factories in Mapstruct. Technically, it requires creation of a factory class which describes how objects are created using non-default constructor.
The sample below contains two methods annotated with @ObjectFactory annotation. These methods will be used to create objects specified as their return types: createVetDto creates VetDto, createOwnerDto creates OwnerDto. Constructor arguments are passed as method parameters.
@ApplicationScoped
public class DtoFactory {
    @ObjectFactory
    public VetDto createVetDto(Vet vet) {
        return new VetDto(vet.getId());
    }

    @ObjectFactory
    public OwnerDto createOwnerDto(Owner owner) {
        return new OwnerDto(owner.getId(), new ArrayList<>());
    }
    ...
}
Object factory must be specified in @Mapper annotation uses parameter of the interface which creates that particular object as it’s shown in a snippet below.
@Mapper(uses = {DtoFactory.class, SpecialtyMapper.class})
public interface VetMapper {
    VetDto toVetDto(Vet vet);
    ...
}
Testing
The original projects was nicely covered with tests, so my task was to do the same for my port. I rewrote the original tests and added tests for mappers and integration tests. Tests, the same as REST controllers, need to be reworked. The rework is smaller for the service tests and much bigger for Rest controllers tests.
Service layer tests
All service layer tests are located in io.helidon.samples.petclinic.service. My project supports only one database rather than the original project supporting three databases, which makes the task easier. The tests perform real database operations in database allowing us to test all aspects of database operations including JPQL queries and CRUD operations. The tests look very similar to the original project tests. I copy/pasted the most of the code. The difference is that Spring supports transactions rollback after test method execution if the test method annotated with @Transactional. It’s very convenient because the database always kept unchanged. Helidon doesn’t have this feature, but I managed to simulate it by starting a user transaction before each method call and rolling it back after it. I collected all ‘transactional’ tests in ClinicServiceTransactionalTest class. All other tests which don’t change the data are in ClinicServiceTest class.
Rest controllers tests
In the original Rest controller tests, mocking is utilized. Spring provides a nice MockMVC testing framework, which is Spring-specific. Consequently, I opted for pure Mockito. Personally, I’m not a huge fan of mocking because sometimes tests using mocks end up testing the mocks themselves rather than the actual logic. However, this isn’t true for all cases; mock tests run faster and developers are accustomed to them.
The typical Helidon mocking test class is demonstrated in the code snippet below. I utilize the @HelidonTest annotation to initiate a CDI container, in conjunction with the Mockito extension @ExtendWith(MockitoExtension.class).
Bootstrapping Mockito is slightly tricky because my JAX-RS resource uses constructor injection, and I also need to mock the field-injected UriInfo class. Mockito poorly supports the use case when both constructor and field injection are used. Consequently, I had to manually create mocks for constructor-injected classes and use declarative mocking with the @Mock annotation for field-injected UriInfo.
Despite these challenges, the test methods look like typical Mockito tests.
@HelidonTest
@ExtendWith(MockitoExtension.class)
public class PetResourceTest {
  ClinicService clinicService;

  @Inject
  PetMapper petMapper;

  @Mock
  UriInfo uriInfo;

  @InjectMocks
  PetResource petResource;

  @BeforeEach
  void setup() {
    clinicService = Mockito.mock(ClinicService.class);
    petResource = new PetResource(clinicService, petMapper);
    MockitoAnnotations.openMocks(this);
  }

  @Test
  void testAddPet() {
    var petDto = createPetDto();
    var owner = createOwner();

    Mockito.when(uriInfo.getBaseUri())
      .thenReturn(URI.create("http://localhost:9966/petclinic"));
    Mockito.when(clinicService.findOwnerById(1))
      .thenReturn(Optional.of(owner));

    var response = petResource.addPet(petDto);
    assertThat(response.getStatus(), is(201));
    assertThat(response.getLocation().toString(),
      equalTo("http://localhost:9966/petclinic/api/pets/1"));

    var pet = (PetDto) response.getEntity();
    assertThat(pet.getId(), equalTo(petDto.getId()));
    assertThat(pet.getName(), equalTo(petDto.getName()));
    assertThat(pet.getOwnerId(), equalTo(petDto.getOwnerId()));
  }
  ...
}
Integration tests
I’ve decided to include integration tests in the project. You can find them in the io.helidon.samples.petclinic.integration package. Ultimately, it’s the most robust way to test all application layers. I’ve utilized the Maven Failsafe plugin to execute the integration tests. Below is the failsafe plugin configuration:
<plugin>
  <artifactId>maven-failsafe-plugin</artifactId>
  <version>3.2.5</version>
  <executions>
    <execution>
      <goals>
        <goal>integration-test</goal>
        <goal>verify</goal>
      </goals>
    </execution>
  </executions>
  <configuration>
    <classesDirectory>${project.build.directory}/classes</classesDirectory>
  </configuration>
</plugin>
Please pay attention to the <classesDirectory>${project.build.directory}/classes</classesDirectory> configuration option. The plugin won’t function properly without it.
The typical integration test is illustrated in the snippet below. I’m using the @HelidonTest annotation to initiate a CDI container and the Helidon web server, and I’m injecting a web target pointing to the running web server. This is a feature of the Helidon testing framework. In the test methods, I call a REST endpoint, retrieve the result, and verify its correctness. This tests the entire chain of layers from the REST resource to the database.
@HelidonTest
class PetResourceIT {
    @Inject
    private WebTarget target;

    @Test
    void testListPets() {
        var pets = target
                .path("/petclinic/api/pets")
                .request()
                .get(JsonArray.class);

        assertThat(pets.size(), greaterThan(0));
        assertThat(pets.getJsonObject(0).getInt("id"),
            is(1));
        assertThat(pets.getJsonObject(0).getString("name"),
            equalTo("Jacka"));
    }
    ...
}
You can execute all integration tests using the mvn integration-test command.
Summary
I composed my summary as a small FAQ.
Is it possible to migrate a Spring project to Helidon?
Definitely yes.
Is it difficult?
Typically no, but it depends on the project. I spent about a day to migrate database and service layer, about 2 days to migrate REST controllers, about a week to migrate tests, and more than a week to write this article. At the end, testing and documenting work is more time-consuming than developing.
Is Helidon different from Spring?
Yes it is, but there are the same or similar components/frameworks/specs used in both, so if you know Spring, Helidon doesn’t look as an alien and visa versa.
What are the advantages of Helidon?
Helidon is based on Java 21 Virtual Threads and is very fast. It supports Jakarta EE and MicroProfile, so it’s a great choice if you are standards-minded.
Where I can find additional information about Helidon?
https://helidon.io and https://medium.com/helidon
If you’re thinking, “Hey, Dmitry! This is a brilliant article, I enjoyed reading it!” you can share a link to this article on social networks as an act of appreciation.
Thank you!

Why you added @HelidonTest to PetResourceTest if everything there is mocked and you don’t need cdi or web context?
Why you run integration tests with failsafe and not just surefire? Isn’t it better to run these tests before packaging the app? If you would add CD pipeline it is probably better to fail build asap?
LikeLike
I added @HelidonTest because I want to run my tests in a CDI container. Not everything is mocked; for example, MapStruct-based DTO to entity conversion is not mocked. I suppose it’s possible to mock everything and eliminate the need for @HelidonTest, but that would require more effort. As I mentioned in the article, I’m not a huge fan of mocking for the sake of mocking. Your tests should test your code, not your mocks.
There is a difference between unit tests and integration tests. I found a good explanation in the Maven Failsafe plugin documentation:
“The Failsafe Plugin is designed to run integration tests while the Surefire Plugin is designed to run unit tests. The name (failsafe) was chosen both because it is a synonym of surefire and because it implies that when it fails, it does so in a safe way.
If you use the Surefire Plugin for running tests, then when you have a test failure, the build will stop at the integration-test phase and your integration test environment will not have been torn down correctly.
The Failsafe Plugin is used during the integration-test and verify phases of the build lifecycle to execute the integration tests of an application. The Failsafe Plugin will not fail the build during the integration-test phase, thus enabling the post-integration-test phase to execute.”
LikeLike
Why you added @HelidonTest to your PetResourceTest class if everything there is mocked and you don’t need cdi or web context?
Why you run PetResourceIT with failsafe and not just with surefire? Isn’t it better to run tests before package and not after that if you use embedded webserver and package app as jar ant not war?
LikeLike
Sorry, I missed your comment and didn’t reply on time.
Regarding your first case. I am injecting a mapper, so CDI is needed. And the mapper itself is a CDI bean.
Regarding your second case. I run it with failsafe because it’s a pure integration test. You can run it with surefire, there is no problem with it. Do what’s convenient to you.
LikeLike
This article shows us that we need to move away from such a convenient thing like Spring Data repositories in order to what ? To write queries manually on JPQL ? It is not convincing reason.
Also, for the future – there is a Jakarta Data 1.0 (under development) https://jakarta.ee/specifications/data/1.0/ – which borrows the same concept from Spring ecosystem, I think when it is released and incorporated into Helidon – it will be much more attractive reason to migrate on.
LikeLike
This article is for those who want or need to migrate a Spring project to Helidon. It can also benefit people with Spring experience who want to use Helidon. I am not advocating for switching; I am simply sharing my experience.
Helidon currently doesn’t implement the repository pattern. The solution I provided (pure JPA) is an alternative. We are working on a solution, and yes, Jakarta Data will eventually be supported as well.
LikeLike
[…] previous article on migrating the Spring Petclinic Rest project to Helidon (see here) received a lot of positive feedback, which encouraged me to explore this area […]
LikeLike